Wednesday, July 29, 2009
Monkey Birthday Crown
This year Kaden chose a monkey theme for his birthday. I decided to make a cute birthday crown for his birthday. I found THIS great crown tutorial & template from Creating Keepsakes. The template in the directions was a little small for Kaden's head (he is going to be 5). I ended up adding another little bit to the crown so that it would fit. For the monkey, I just free handed the face on tan paper. Then, I cut 1 big circle & 2 small circles out of brown for the head & ears. I used small black circles for the eyes & a small oval for the nose. I just drew the mouth on with a black marker. Kaden is SO excited to wear his crown on his birthday!!!
Sunday, July 26, 2009
Cookie Sticks
I got this recipe out of the Taste of Home fun food magazine. I love making normal things in different ways. This recipe is really quick & easy! Here is the recipe that I used. I changed the original up a bit!
1 cup canola oil
1 cup sugar
1 cup packed brown sugar
2 eggs
2 tsp vanilla extract
3 cups all-purpose flour
1 tsp baking soda
1 tsp salt
1 cup semisweet chocolate chips
1 cup milk chocolate chips
In a bowl, combine oil, sugars, egg, & vanilla. Mix well. Combine flour, baking soda, & salt. Gradually add flour mixture to sugar mixture.
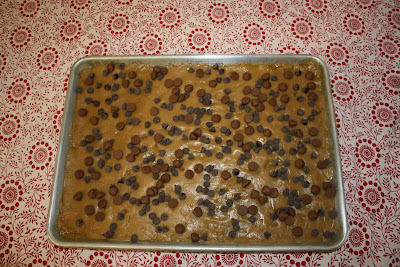
On a greased jelly roll pan press out dough to fill pan. Sprinkle with chocolate chips & press in lightly.
Bake at 375 degrees for about 10 minutes. Cool for 5 minutes. Cut with a pizza cutter into 1 inch strips. Move to wire racks to cool.
I had to take a sample just to tell you if they were good or not....I would vote YUMMY!!!
Wednesday, July 22, 2009
Colorful Canvas
Months ago I had the boys paint their own canvas for their room, but we never hung them up. Their room is pretty bare...so I decided to redo them & use them to decorate their room. I came up with the idea last night & could hardly wait to get them finished today. Here is the finished product.
I just took coordinating paper & modge podged it onto the canvas. Then, I did another layer of modge podge to seal the design. The little robots are chipboard robots that I spray painted red. They came with faces, so I covered it again with paper (& modge podge). I love how they turned out. I just can't decide if I should leave them how they are or add their initial to the canvas. Now, we just need to get their room painted :)!
Watermelon Sugar Cookies
I came across a really cute sugar cookie idea, but I changed it up a bit. Rather than using frosting...I thought that it would be easier to just color the cookie dough different colors. This is my favorite sugar cookie recipe:
1 cup butter (softened)
2 eggs
1 1/2 cups sugar
2 tsp vanilla
1 cup sour cream
4-5 cup flour
2 tsp baking powder
1 tsp baking soda
1 tsp salt
For the Watermelon Cookies you will also need:
1/3 cup mini chocolate chips
red food coloring
green food coloring
Mix butter, eggs, sugar, sour cream and vanilla in a large bowl. In another bowl mix all other dry ingredients. Add dry ingredients into wet ingredients.
Divide the dough (I did did one bigger than the other). Color the biggest amount red & the smaller amount green. Chill each color for about 2 hours.
Roll 1/4' thick. You will need to different circle cookie cutters. Cut the red dough with the smaller cookie cutter. Then cut the green with the bigger cookie cutter & the inside with the smaller cookie cutter. Place the green around the red circle & cut the whole thing in half. Place on an ungreased cookie sheet. Add the mini chocolate chips. Bake 7-8 minutes at 350 degrees.
I usually cook them about 6 minutes and then check them every minute after that.
Tuesday, July 21, 2009
♥ MY LIFE ♥
I try to keep a journal. I do really well for a while & then don't write for months. I want to write down what is important & leave out all of the useless junk. I found a super great idea over at U CREATE. It is free...who doesn't love FREE??? Go & check it out!!!
Monday, July 20, 2009
CRAZY!!!
Things have been CRAZY busy around here. I have a few projects that I need to get done, but I'm not sure WHEN I will get to them! I have a few projects for the boys room & also a cute frame project for the bathroom. Sorry for the lack of posts...but there will be more coming soon...I PROMISE!!!
Saturday, July 18, 2009
YUM--Baked Ziti
This is one of our favorite recipes. It is so yummy & makes enough for leftovers. I found this recipe a while back on ALLRECIPES. I ♥ that website!
Here is the recipe:
1 lb dry ziti pasta
2 jars Prego Italian Sausage & Garlic pasta sauce
6 oz provolone cheese, sliced
1 1/2 cups sour cream
6 oz mozzarella cheese, shredded
2 Tbsp grated Parmesan cheese
1. Bring a large pot of lightly salted water to a boil. Add ziti pasta & cook until al dente.
2. In a large skillet, warm pasta sauce over medium heat.
3. Preheat the oven to 350 degrees F. Spray a 9x13 inch baking dish with cooking spray. Layer as follows: 1/2 of the ziti, provolone cheese, sour cream, 1/2 of the pasta sauce, remaining ziti, mozzarella cheese, & remaining pasta sauce. Top with grated Parmesan cheese.
4. Cover with aluminum foil & bake for 30 minutes in preheated over, or until the cheese is melted.
Saturday, July 11, 2009
Gettin' Girlie
My sil is due to have my newest niece in less than a month. Today is her baby shower. I wanted to make something cute & foofie. I have two boys...so I like to act out on the little girls in my family. Last night I decided to hurry & make her a tutu. It was really pretty simple. I bought some elastic, tulle, & little flowers to sew on.
First decide how big you need it. I did about 12 inches for a tiny baby tutu. Sew it to make the waistband. I used 1/4 in elastic. You could also use the cute colored adult headbands & trim it down to size.
Then, cute your tulle to length. I did mine 6 inches wide by about 14 inches. Figure how long you want the tutu down from the was & double it. So, my tutu is 7 inches from the waist...so I cut mine to 14 inches.
Fold your fabric in half & hold it by the top "loop". Starting from the middle, slide your loop under the elastic to the outside of the elastic. Then take the ends & thread them through the loop. Pull tight. Continue until the elastic is all covered.
For a finishing touch, I sewed on the cute little flowers.
I did this (shopping & assembly) in one night...it really was easy.
I really hope that Tiffany & Ryan like it for little Paige!
Friday, July 10, 2009
Menu List
A while back I made a menu list so that I could track what dinners I had planned on. I used to write my list down on a lined piece of notebook paper, but by day 2 it had always disappeared. I have mine posted on THIS magnet board that I made from a thrift store purchase.
I thought that I would post this so that you could click on the picture & print it out if you would like to use my menu list.
Saturday, July 4, 2009
Pancake Social
Last night at the last minute, we decided to have some family over for what my hubby deemed..."A Pancake Social". When anyone questioned him about it...he said "A pancake social is like an ice cream social, but instead of ice cream, you have pancakes!" OK-simple enough.
Well, I wanted to make it a fun & festive, but didn't really have the time. I had about 30 minutes to do some quick shopping (on a budget). Of course...I went to the dollar store & picked up my table cloth, plates, cups, & napkins. They were out of decoration stuff...so I decided to improvise! Earlier in the day, the boys & I had made THESE cute little fireworks out of chenille stems. I cut the string off & there is a cute table decoration.
Then my sister-in-law shared THIS cute centerpiece idea with me. I had a ton of the drink containers, but improvised a bit for the top. I took some of the leftover chenille stems & twisted them around a pencil. Then I just tugged a bit to stretch them out. I used some of the leftover craft foam from our flag project & cut out strips & stars & taped them on to the tube. The tape didn't hold great, but I didn't have time for glue!
I used an old mason jar to hold my forks & luckily my kitchen is red...so I had a cute red napkin holder. I do have a confession...this picture was taken AFTER breakfast. The poor PLASTIC table cloth didn't hold up too well!
We had a blast & the food was super yummy! This is going to be a new 4th of July tradition. Hope everyone is having a great 4th of July!
Subscribe to:
Posts (Atom)